Inserting an image
An image can be inserted into the Welcome text area or into an article. Suggested guidelines for using images are:
- The best style of image is a banner style long skinny rectangular shape with a maximum width of 420 px – your account template will automatically resize any image up or down to 420px in width.
- The height of the image is at your discretion
- The best position is stacked between two blocks / paragraphs of text – this is the best mobile friend positioning for an image
- The best file formatt is JPEG (.jpg) or PNG (.png)
- Resize or crop your image to the correct size before uploading – this is essential as there is an image editor function in your account’s image folder
Note – Your account template will automatically resize any image up or down to 420px in width.
If your image is smaller you’ll need insert the Class tag of “None420” on the image in the text – click here for more info
If you want to insert an image in to your text do the following:
- Click and open the “Edit Welcome text” screen
- Click into the Welcome text and say no to the “Paste from Word” pop-up box
 Insert/position your cursor where you want the image to be inserted
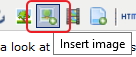
- Go to the tool bar with in the Welcome text and click on the “Insert image” icon – looks like stamp, toward the end of tool bar’s second row of icons
- This opens your Moxiecode Image Manager, click on the yellow “Image” folder
- Go to top right and click on “Upload”
- Click on “Choose files” or “Select files” – this allows you to access your computer & network
- Browse, find and select the image file you want uploaded
- Click “Open”
- Click on “Upload to server” – this places the image file into your “Image” folder
- Editing the image to correct size:
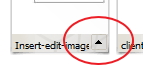 Find the image file in the Image folder and go to the bottom right corner of the file
- Click on the black up-arrowhead to access the “Edit” option
- Click on the “Edit” option in the drop down menu and then select “Resize” – when resizing we recommend adjusting the width and allowing the height to auto reset
- Click “Apply”
- Click on “Save” – as same file name or give it a new file name
- Once saved double click on the image file – this will insert the image into the Welcome text area where your cursor was positioned
Remember – Scroll to the bottom and click “Submit” to save, then send a test email and check the image from the test email.